How to Splice Overlay on CapCut PC Step-by-Step Guide 2026
How to Splice Overlay on CapCut PC is a common question for new video editors who prefer working on a big screen. Editing on a PC feels more comfortable, honestly. You can see details clearly and control every small cut with ease.

Many creators now use CapCut because it is simple and powerful. Overlay splicing helps you place one video on top of another. This makes your content look creative and professional. You see, minor modifications can make the entire video different.
Here you will be taught all step by step in this guide. I will make it plain in simple terms. You will not have to stress over following along even when you are new. Let’s understand overlay editing clearly and practically.
What Is Overlay Splicing and Why It Matters
Overlay splicing means adding a second video or image above your main clip. You can trim, cut, and match it with the base video. This technique is useful for reactions, tutorials, and storytelling.
When you learn How to Splice Overlay on CapCut PC, you gain more control over your edits. It helps you show two visuals at the same time. For example, a face cam over gameplay looks more engaging and natural.
Why Editors Prefer CapCut for PC
CapCut for PC gives better control compared to mobile editing. A mouse and keyboard make cutting overlays more accurate. The timeline is wide, and you can zoom in for fine edits.
Many users also work on CapCut for Mac because it runs smoothly there too. On PC, large screens help spot mistakes early. Well, that alone saves editing time and effort.
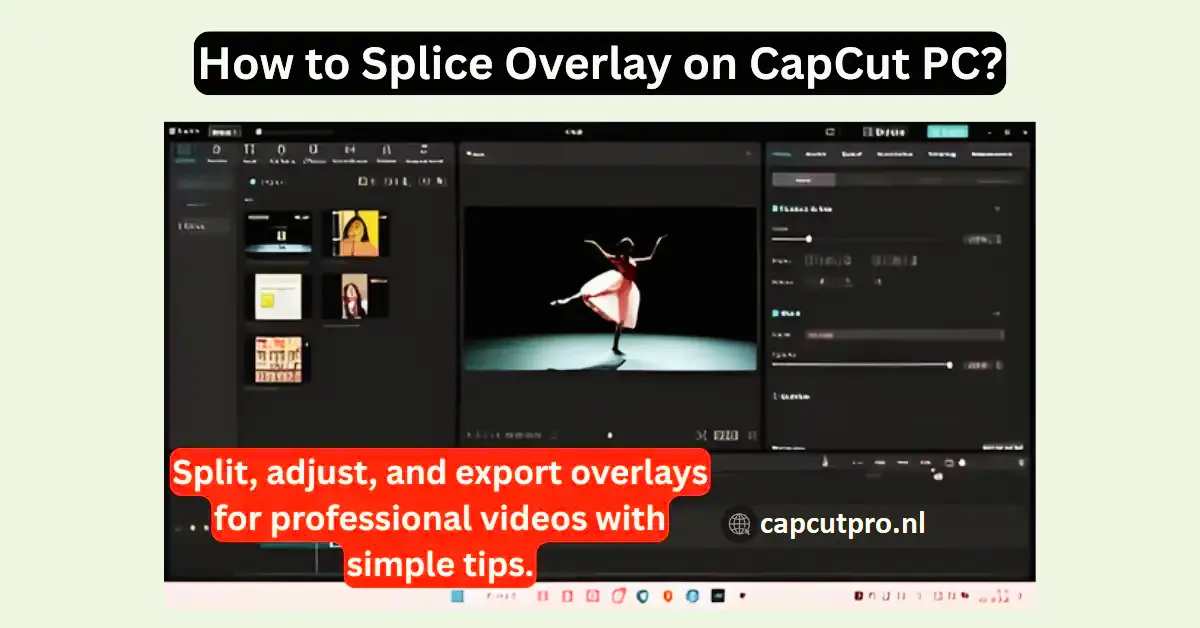
How to Splice Overlay on CapCut PC the Right Way
The first step is to open CapCut and form a new project. Bring your key video into the timeline. This will be your base layer where everything starts.
Now import the second clip. Drag it above the main video as an overlay. This is the core step in How to Splice Overlay on CapCut PC. You can trim the overlay edges and place it exactly where you want.
Preparing Clips Before Overlay Splicing
Before splicing, make sure your clips are ready. Trim unwanted parts early. This keeps your timeline clean and easy to manage.
I always rename clips to avoid confusion. Honestly, it saves time later. Small habits like this improve editing speed and reduce mistakes.
How to Splice Overlay on CapCut PC Smoothly
Select the overlay clip and use the split tool. Match it with the main video timing. Adjust position and scale using the preview screen.
This step needs patience. Once synced well, your overlay looks natural. That’s the real magic of How to Splice Overlay on CapCut PC done properly.
Adjusting Overlay for Better Visual Balance
After splicing, adjust opacity and position. Move the overlay to corners if needed. This keeps the main content visible.
Avoid making overlays too big. Simple placement looks more professional. Well, clean edits always win viewer attention CapCut for iOS.
Common Mistakes While Splicing Overlays
One common mistake is ignoring video resolution. Mismatched sizes cause blur and distortion. Always check preview before exporting.
Another issue is poor timing. Overlays that appear too long feel annoying. Keep them short and meaningful for best results CapCut Mod APK.
CapCut Versions and Overlay Features
CapCut Pro offers advanced tools for serious editors. Some users also talk about CapCut Pro APK and CapCut Mod APK, but official versions are safer.
You may find CapCut Pro APK Download pages online, including CapCut Pro APK Download Latest Version. There is also CapCut Old Version for low-end devices. CapCut for Android and CapCut for iOS are popular, but PC editing gives more comfort.
Conclusion
How to Splice Overlay on CapCut PC Overlay splicing is a powerful editing skill. It assists you in narrating stories more and maintaining the attention of the viewers. After some practice it is very easy.
CapCut on PC will help to make the editing process more accurate and easier. Large screens, and transparent schedules can be very helpful, particularly to new people.
Just be patient and continue to experiment and your videos will get better within a short time. Use different overlays and styles to discover your own appearance.
Now you know How to Splice Overlay on CapCut PC. Begin editing and have fun being creative. You will be secure with every new project.
FAQs
1. What is overlay splicing in CapCut PC?
The term overlay splicing is used to refer to a second video overlaid on top of the initial video and cut accordingly to fit the timing and space of the video to improve visual storytelling.
2. Is CapCut PC free to use for overlays?
Yes, the free overlay editing with simple tools that come with CapCut PC should suffice to most new and amateur video projects.
3. Can beginners learn overlay splicing easily?
No, there is no complicated interface with CapCut. Novices can also acquire overlay splicing in a short time without professional editing.
4. Why does my overlay look misaligned?
Misalignment happens due to wrong scaling or timing. Adjust size, position, and split points carefully to fix this issue.
5. Does overlay editing affect video quality?
If exported correctly, overlay editing does not reduce quality. Always choose proper resolution and frame rate before exporting.
6. How to Splice Overlay on CapCut PC faster?
Take keyboard shortcuts, prepare clips and zoom on timeline. These practices accelerate overlay splicing.